A Practical Guide to the Denafom Kite Method
Last updated
Denafom is a playful made-up word. Some folks who make kites for fun began using it to describe their favorite framing approach, and the label caught on in their circle. It does not point to any real tradition, region, or era, and it works best as an easy name for a simple idea.
Here is that idea in short: build a classic diamond frame, but curve the side-to-side spar using a taut line between its ends, and join the two spars with a crisscross wrap of thread in place of adhesive. The arc keeps the kite steady once it is airborne, and the tied joint lets you take the frame apart, tweak it, or mend it without fuss.
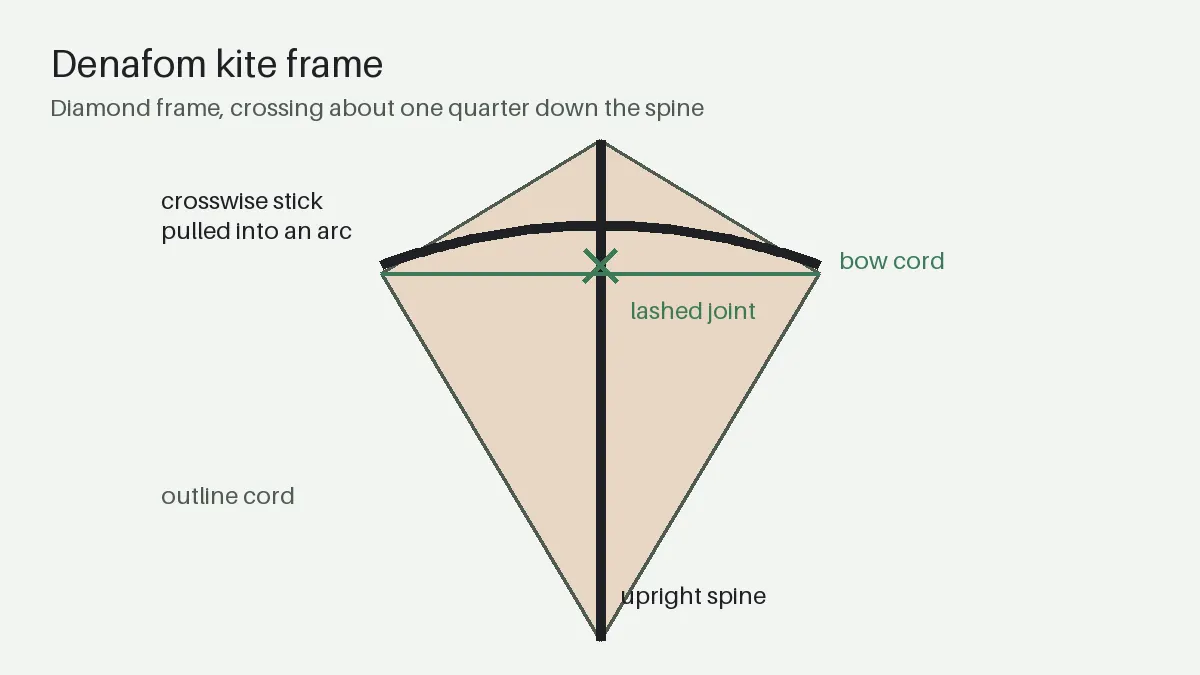
What the Arc Does
Kites with a perfectly flat frame are prone to swinging and diving in choppy wind. A curved crosspiece pushes the sail's wings back a touch, forming a shallow angle that encourages the kite to stay pointed into the breeze.
The denafom method creates this arc with a line under tension, not by heating or soaking the wood into shape. As a result, the amount of curve can change from one day to the next, matching calm conditions or livelier ones with just a twist of the knot.
Materials Worth Using
Good sticks are the foundation. Bamboo shaved down to slender strips bends in a smooth, even line and returns to straight afterward, and wooden dowel, though stiffer, is widely available. Before cutting, look along the length of each one and discard any that has a twist or a kink.
Almost any light sheet can cover a denafom frame, from tissue to parcel paper to a trimmed plastic sheet. Paper is the friendlier choice for decorating, and plastic holds up in morning dew. Cut the cover with a bit of extra give, since the bow line already provides the arc and a stretched sail would work against it.
Putting the Frame Together
Here is the sequence most builders follow.
- Choose two light sticks, making the crosspiece somewhat shorter than the spine.
- Set the crosspiece about one fourth of the way down from the spine's top end.
- Bind the crossing with thread wrapped in an X pattern, then lock it with tight turns around the center.
- Nick each tip of the crosspiece and tie a line across, drawing it in until a soft curve appears.
- Loop a border line around all four stick ends so the covering has a sturdy edge.
A light curve is the safest starting point. Over-bending makes the kite lazy in the air, and under-bending barely reduces the swinging.
Fine-Tuning and Upkeep
With the sail attached, take the kite out on a day with a steady moderate breeze and watch its movement. If it drifts to one side or circles, alter the bow line gradually until the flight evens out. A denafom kite answers small corrections well, so gentle steps work better than big ones.
When you are done for the day, release some tension on the bow line so the crosspiece can relax and hold its spring. Since denafom is merely an invented name, try the same trick on different shapes, perhaps a hexagon or a wide diamond, and record what you learn.